|
|
Related Documentation:
GENESIS contains many software components. The source code of the most important ones are publicly available from a central repository. (The server repo-genesis3 is coded as the default server in the DeveloperPackage, a default that can be overwritten using command line options, see also configuration of a backup repository.) Other software components can be made available from other sources. The DeveloperPackage, when configured correctly, automatically incorporates software components from geographically distributed sources. The addition of a new software component to GENESIS is the equivalent to adding a new column to the associative array constructed by the DeveloperPackage.
New software components can be added to the configuration of the neurospaces_build script of the DeveloperPackage. All the other tools of the DeveloperPackage, such as tools to compile and install, tools to synchronize the source code with remote servers, and tools to generate and publish documentation on a website will work with the new configuration.
For smooth integration with the GENESIS installer, it is a requirement that the top level source directory of the new component contains a configure script, and a Makefile with the targets clean, check, dist, distcheck, install, uninstall, docs, html-upload-prepare, html-upload, and dist-keywords.
The following steps should be performed on your developer machine each time you wish to start development of a new software component.
Use the command line arguments “--enable <your-software> --regex <your-software>” to limit the operations given below to only the software component named. Here, as an example, we use “<your-software>” which should be replaced by the name of your software component.
’<your-software>’ => {
directory => "$ENV{HOME}/neurospaces_project/<your-software>/source/snapshots/0", disabled => 0, # 0 means enabled, # or fill in the reason why the component is disabled order => 14, # a (float) value relative to the order of the other components version_control => { port_number => 4693, # beware of TCP port clashes repository => "$ENV{HOME}/neurospaces_project/MTN/<your-software>.mtn", }, }, |
This code block includes the directory name where sources are to be found, the build order, and version control information (Note: the server port number cannot be changed at anytime). The $ indicates a terminal prompt.
It is common practice to first disable the new software component inside the neurospaces_build script during the early phases of development. The component can then be enabled on selected machines by adding the following code to the configuration file with name /etc/neurospaces/developer/build.yml:
---
all_packages: <your-software>: disabled: ’0’ |
$ neurospaces_create_directories --regex <your-software>
|
$ neurospaces_init --regex <your-software>
|
cd ~/neurospaces_project/<your-software>/source/snapshots/0
mtn --db=~/neurospaces_project/MTN/<your-software>.mtn --branch="0" setup . |
Then use the other monotone commands to track your sources (see Version Control for more details)
Serving the source code over the internet makes it available to others. It is best, although not required, to employ a dedicated user on your machine to serve the source code.
The following steps will enable others to access your new software.
You can then enable the new component using –regex and –enable command line options, or alternatively it can be enabled permanently on selected machines by adding the following code to the configuration file with name /etc/neurospaces/developer/build.yml:
---
all_packages: <your-software>: disabled: ’0’ |
neurospaces_create_directories
|
neurospaces_init
|
neurospaces_pull --enable <your-software> \
--regex <your-software> --repo-pull <ip-address-of-the-remote-server> |
neurospaces_update --enable <your-software> \
--regex <your-software> |
neurospaces_install --configure
|
The “--configure” argument enables source code configuration, which is needed for a new software component.
To extend the functionality of a pre-existing GENESIS Component see Extending the Model Container.
To extend the functionality of GENESIS by adding a new Component see Add Solver Object.
As a modeling project grows, it may become necessary to create and maintain a new software component. We now show in detail how to add a new software component to the DeveloperPackage as well as how to create the corresponding monotone repository on a repository server. For this example, we will be adding a new package called the exchange package.
To add a new package to the system you must first make the script neurospaces_build aware of your package. First locate the package matrix in neurospaces_build:
my $all_packages
|
Next we must add an entry for our package, first we must designate a port number for performing push, pulls and syncs. The current port numbers in use range between 4692 (NS-SLI) to 4700 (userdocs), so it is safe to designate port 4701 as the port for the exchange package.
WARNING: Make absolutely certain that no two packages point to the same port number. Two packages attempting to sync to the same port number can result in a corruption of your repository.
Now we add our entry complete with port number:
exchange => {
dependencies => { ’model-container’ => ’for storing the model in computer memory’, }, directory => "$ENV{HOME}/neurospaces_project/exchange/source/snapshots/0", order => 1.5, version_control => { port_number => 4701, repository => "$ENV{HOME}/neurospaces_project/MTN/exchange.mtn", }, version_script => ’neurospaces_exchange --version’, }, |
Here we add an entry to the package matrix (a Perl hash) with the following attributes.
For more context regarding the central server setup, see Installation Debian Server 5.0.3.
In this scenario a user has created the exchange package and wants to share the code by propagating it via the central repository. There are three machines:
First the the administrator of the repo initializes a new repository in the same location indicated in the directory hash from the values in the package matrix from neurospaces_build. As the dedicated monotone user on the repo we execute this command to create a blank repository:
mtn --db=~/neurospaces_project/MTN/exchange.mtn
|
Next we need to add the public keys for User1 and User2 to the blank repository. To add their public keys you must first obtain them either via a secure transfer (encrypted email or im) or you can get it from a pre-existing repository via a command like this:
mtn --db=~/neurospaces_project/MTN/heccer.mtn pubkey user1@email.com >~/user1.pubkey
|
Once they’re in files you can read them into the blank exchange repository:
cat ~/user1.pubkey ~/user2.pubkey | mtn --db=~/neurospaces_project/MTN/exchange.mtn read
|
Now with the blank repository in place with the users public keys, the exchange package can be served via neurospaces_serve as well as synced and pulled via neurospaces_sync and neurospaces_pull respectively. With the modified neurospaces_build from the previous section installed on all of the users machines we can serve the repositories on the repo via:
sudo -H -u monotone nohup neurospaces_serve &
|
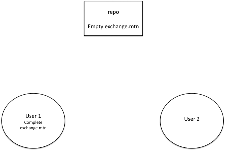
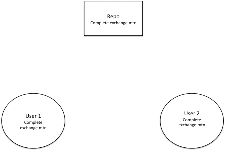
So the code sharing scenario can be illustrated like this:
User1 has the complete set of code in his repository for the exchange package. The repo serves an empty repository on a designated port for the exchange package. User 2 has no repository or code yet.
|
|
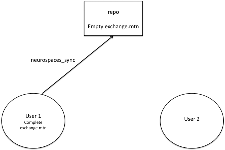
User1 performs a sync, which pushes all code revisions to the repo exchange repository.
|
|
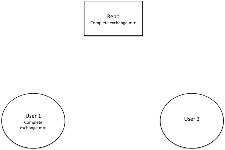
The repo now has a complete set of code for the exchange package.
|
|
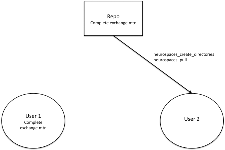
User2 wants to download the exchange package, so they first perform a neurospaces_create_directories to create the checkout directories for source code. User2 can now perform a pull, which will automatically create their exchange.mtn repository in the correct location and make a connection to the repo to pull a complete set of source code revisions.
|
|
Now User1 and User2 have a all code revisions and can collaborate work via the centralized repository.